Packager Documentation
Table of Contents
Orders
Find and View Orders
To find a specific order number or address, the search bar can be used. There are multiple options for viewing and sorting the order list. Click the down arrow for a column to sort in ascending or descending order, or remove a previously added sort.

- Order number
- Address of property
- County address is located in
- Legal description of property
- Order creation date
- Name of user who created order
- Current progress of order
Actions
These buttons help to quickly and simply complete an action for the related order 
8. This icon takes you to the edit page for the current step of the order
9. Delete an order using this icon. Published orders cannot be deleted.
Moving forward in an Order
After clicking edit for an order, you may move forward or backward in the order by clicking the arrows on either side of the page as shown in the image below.
10. Go to previous step
11. Go to next step
Order Process
Step 1: Create an Order
Enter Order Information
- Select a company from the drop down.
- Enter Order number
- Click Start button
- Orders found in Ramquest will automatically input address information, and user can continue to the next step.
- Click this icon to view map preview of property address


- If the order number is not found, address information must be entered manually.
As you type, the system will attempt to validate the address and populate the county.
- Enter legal description of property if known.
- Once address is validated, click Next to continue to the next screen.

Upload Commitment Document
After all information for the order is completed, the order commitment is uploaded. If an incorrect commitment document is selected, selecting a new one replaces the previous selection. Only one commitment document may be uploaded during this step.
- If Title System (Ramquest) integration documents were found, expand the list by clicking the down arrow.
Then select the desired commitment document. - Instead of choosing from the Title System like in step 1 above, you may select or drag and drop a pdf document from you local computer.
- Once the commitment document has been selected via method 1 or 2 above, click the Create Order button to create the order.
Step 2: Link Matches
Link / Delink
Within the document, the user can link and delink matches. The image below shows all relevant buttons for the link and delink process. Links are added only for matches with a document uploaded.
- Upload a new commitment document. This replaces the existing commitment document and will change matches found.
- Reload the page
- Link all matches found in the document
- Remove all links for matches found in the document
- Link individual document. Icon will turn red after document is linked
- Delink individual document. Icon will turn blue after document is delinked
- Find link in commitment document on the left side. Pdf commitment document will scroll to match in document.
- Overwrite links option:
- If On (default) any existing links in the commitment document pdf will be replaced if any of the existing link text matches our linking text
- If Off any existing links in the commitment document will not be overwritten with links we create

Matches Table
The matches table shows all matches that were found in the document. Other information, such as whether an uploaded document was found, a preview and an upload/replace button is found in this table. Features on this table and their functions are shown below
- Matches column shows the name of match found (e.g. Reception Number 12345)
- Document preview icon is visible for all matches with an uploaded document. Click to view the document. If a document has not been uploaded or not found, a warning yellow exclamation point icon will be shown instead.
- The upload button for uploading a document for a match. If a document is not found or needs to be replaced it can be uploaded using this button.

Uploading Match Documents
After clicking the upload button (Figure 1, #3) for a match, the following steps are used to upload a match document. If a previously uploaded document is found, document match found will be shown under match name.
- Select a PDF file to upload for the match.
- Select a document from the Ramquest integration. This list shows pdf documents that have been uploaded into Filescan.
- Select a document match from the El Paso Title Plant integration for only the current match.
- Select all document matches from the El Paso Title Plant integration that were found.
- Select a document previously uploaded from the Document Repository for this order.
- If you would like to upload multiple matches, press the left or right arrows to the side of upload box and select documents.
- When finished uploading matches, click the Save button.
- The preview icon for the document match(es) should show as soon as the document has finished uploading and the link icons will now be available.

Uploading a New Commitment Document
A new commitment document for the order may be uploaded. This will replace the previous document and the match table will show matches found for the new commitment document.
- Click the Upload button

- Select a new commitment document from the Ramquest list or from your local computer.
- Click upload. The new commitment document is now viewable in the pdf viewer on the left side of the screen.

Quick Download
1. The download icon will open a dialog for downloading the current commitment document. 
2. On the dialog, the Also publish this order checkbox will allow for publishing the order after downloading (default option). This allows for a quick download of the commitment with hyperlinks included so you can manage sending out the commitment on your own. If the option is unchecked you can just download the commitment document but the packager order will not be published. It will remain in its current status on the order list dashboard.
3. Click the Download button to download a copy of the commitment document.
Warnings on Link Matches Page
When there are no linked matches associated with the document, a warning will appear stating that no matches were linked in the document. Clicking yes will let the order proceed, clicking no will keep the order on the Link Matches step.
Step 3: Assign Parties
All parties associated with the order that have a valid email can be added and assigned to party groups. Moving an incomplete party to a different group will require an email address to be added before saving changes.
Assign Parties page
All parties that the user would like to have access to the commitment and linked documents are added here. The images below correspond with the numbered lists of features.
- Party groups are color coded and grouped together for easy identification.
- Edit information for an existing party.
- Remove (Unassign) an existing party.
- Send Email checkbox. If checked, an email is sent when publishing or updating an order. If not checked, an email is not sent.
- Add new party (see Add Order Party) section below.
- Reset order parties to match how they are set in Ramquest. This will clear the existing party list and replace with the Ramquest parties.

Add Order party
Order parties can be added to an order under any party type and group. To save a new party member, email address is required and a party type must be selected.
- At top top of the parties grid, click the add party button (Assign Parties Figure 1, #5).
- Enter party member information (party type and email are required).
- There are three groups party types get associated to: Buyer, Seller, and Miscellaneous.
- If the Sponsor checkbox is checked, this means the party can have a linked image (e.g. a logo) shown on the order in Stacka (Storage System for the order and linked documents). Any party can be selected to sponsor an order, and will receive an email to setup sponsor information if not already completed.
- Click the Save button to add the new party to the order.

Step 4: Additional Documents
Include and exclude underwriter documents from an order on this page. Additional documents can be added to the order and shared with only selected party members.
Include/Exclude Underwriter Documents
All Underwriter documents are automatically included in the order.
- Deselect a single underwriter document to exclude it from the order.
- Select/Deselect all documents at one time with this checkbox.
-
Click a document thumbnail to view the full document.

Add Additional Documents to Order
- Click the Upload button to add additional documents to an order.

- Choose a document from your local computer or choose one from the Ramquest Integration (Filescan).
- Choose the desired parties that will be able to see the document.
- Click the Upload button to upload the document and add to the order.
- NOTE: If you want to assign different permissions for the same document, you will need to upload the document multiple times (once for each set of permissions).


Unlock/Remove Additional Documents
Additional Document(s) can be unlocked, making them visible on the public stack page.
- Click the padlock icon below the thumbnail. The icon will change to an unlocked icon and document will be set to public.
- To lock an unlocked document (make private), click the unlocked padlock icon, and the document will become private (users will have to login to view it).
- Click the delete icon to remove a document from the order. Confirm deletion by clicking OK on the confirmation window.

Step 5: Email Setup
Only one email template can be assigned to an order. The template can be edited and saved before finalizing selection. Subject line for email is set to order address and order number automatically, but can be changed before assigning template to the order.
Create new Email Template
New email templates can be created using the HTML editor. For more information about HTML editor functions and features, proceed to the HTML editor section.
- Click Create New Template button on right side of page.

- Enter template name in text box. This field is for your use only to identify the template later.
- Enter an email subject for this email for this order. It can be changed again later after saving the template.
- Use the HTML editor to create body of email template
- After creating the template body and the template name and email subject are entered, click the Save and Use Email Template button on the right above the editor.


Use An Email Template for an Order
Available email templates are company level templates available to the user.
Your email templates are custom email templates you have created available only to you.
- Select a template from Available email templates for this order (Pre-defined for use by all company users) or Your email templates (Created and defined by you) drop down.
- Click the Use Email Template button to assign template to order


Edit and Update an Email Template for Order
Changes can be made to email templates any time before publish.
- Once you have selected an email template and made your changes, click the Save and Use Email Template button. If you just modified one of your custom templates the template will then be assigned to the order. See step two for detail on when modifying a company template.

- If you have made changes to one of the company templates, you will see a dialog open like below. Check the Save to your templates for future use?" checkbox if you want to save a copy of this template in your custom template area for later use. Click the Save and Use Copy button to save this template and assign to this order.

Delete Email Template
Only templates under Your Email Templates can be deleted. Templates associated with an existing order cannot be deleted.
- Select template to be deleted from Your email templates drop down.
- Click delete icon to the right of template selection drop down.

- A confirmation dialog opens. Click the Cancel button to not proceed with deleting or the Delete button to confirm deleting the template. If the template is in use you will see a warning message on the top right of the screen show saying the template cannot be deleted.

Step 6: Preview
This page shows a preview of the order before publish. If changes need to be made, return to relevant order step and make changes. No changes can be made from the preview page.
Document Preview
All documents associated with the order are sorted by party type. Only party types with assigned members are shown. Commitment document, Linked document(s) and Underwriter document(s) are shared with all parties. Additional documents are shared with parties selected while uploading additional documents.
Documents are organized by party type, and outlined based of document type.

- Party Type
- Commitment Document
- Linked Document(s)
- Underwriter Document(s)
- Additional Document(s)
Email Template Preview
Email template selected in step 5: Email Setup is shown on the top left of the page. If there is an error, or the incorrect template is shown, use the previous step button to.
- Name of Email Template selected
- Subject line of email
- Body of email
Stack Options
Stack name is automatically set to address associated with the order. This can be changed before publishing the order. Stack name is required to publish order, and can be left as default stack name.
- Stack name text box
- Clear Stack name field
Import to File Scan
All order documents are imported to File Scan on publish if this option is selected. This is automatically checked for orders.
- Checked box will import order documents to File Scan
Make Stack Public
Public stacks will send a public link to parties in the order. This will not require the user to login to Stacka in order to view their documents. Only documents marked as public will be shown on the public stack.
- Check box to make stack public
Publish Order
Click the Publish button at the bottom of the page to publish the order. A Stack will be created on Stacka, and email invites sent to all parties so they can login to Stacka to view order documents shared with them.
- Click Publish to publish the order
Step 7: Publish
Publish order
After the order is published, it is shown on the orders page with a status of published. Published orders cannot be deleted. You will automatically be taken to step 2: Link Matches after clicking the edit button. Once changes are made, the order will need to be updated for Stack to reflect the changes.
Edit and Update Published Order
All orders can be edited and updated after publish. Changes can be made on any step of the order and saved. For more details on order step functions, go to page for that step. All functions available before publish are available after publish.


- Click the edit order button to edit an order
- After there is a pending change, an update counter will show on the bottom of the page
- To update an order, click the update stack button on the bottom of any page
- On the preview page, the order can be updated using the Update Stack button
Email Templates
On this page, company Email templates can be created, viewed and edited for packager. All of these functions can be performed using the text editor that appears on the page. Using email templates ensures a consistent style and layout for all user emails.
Add New Email Template
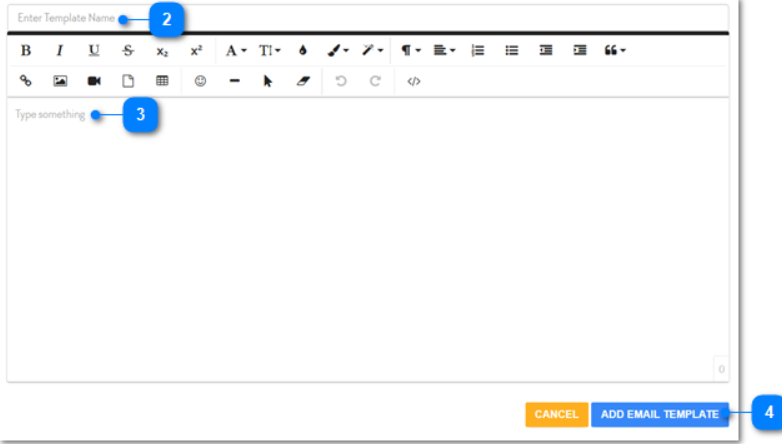
New custom email templates can be added on this page. To add a new email template, follow the directions below. For more information about HTML editor functions and proceed to the HTML editor section.


- Click Add New Template button
- Enter email template name
- Use HTML editor to create email template contents
- Click Add New Template button on bottom of page to save the template
- Email template will now appear under Custom Email Templates list
Edit Default Email Template
After an email template has been created it can be edited on this page using the HTML editor. For more information about HTML editor functions and proceed to the HTML editor section.

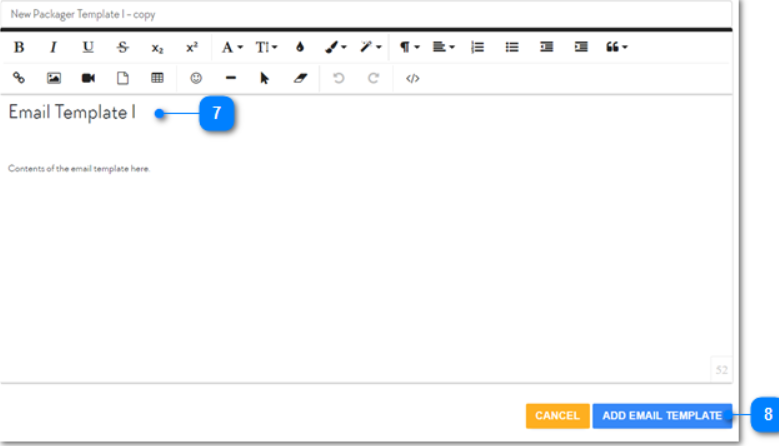
- Click the copy icon for the default email template
- Use the HTML editor to make changes to email template
- Click Add Email Template button
- All changes are saved, and template is listed under Custom Email Templates
Edit Custom Email Template
Any Custom Email Template can be edited and saved. Unlike with Default Email Templates, a copy will not be made of the template. Changes will be saved to the original custom email template. For more information about HTML editor functions and proceed to the HTML editor section.

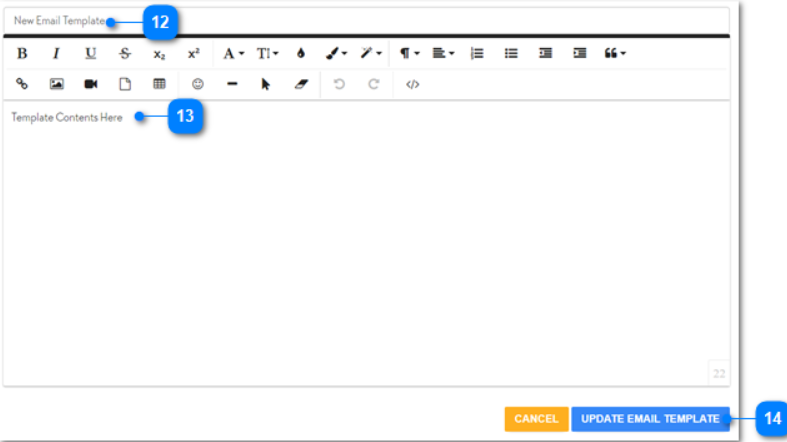
- Find the Custom Email Template you would like to edit
- Click the edit icon
- Change custom template name, if desired
- Make changes to the template using the HTML editor
- When finished editing template, click update email template button
- Changes are now saved. Template reflects changes made
Delete Custom Email Template
Only templates that are not associated with any order can be deleted. If a template is associated with an order, deletion will not be allowed.

- Find the Custom Email Template you would like to delete
- Click the delete icon for that template
- Confirm deletion of template by pressing delete button
- Template is now deleted
Underwriter Documents
For each underwriter, default documents can be uploaded. For each order the underwriter documents will automatically be included in the order based on underwriter. If a document will no longer be needed for any order, it can be deleted on this page.
Upload Underwriter Document
Underwriter documents can be uploaded on this page. Documents are organized by Underwriter.

- Click the add new document button ( ) next to the correct underwriter
- Select one or more documents to upload
- Enter document description
- Click upload button
- A spinner will show while the document and thumbnail are loading
- When finished, the document thumbnail will show with description underneath
Preview Underwriter Document
A document preview is available for each Underwriter Document.
- Click any document thumbnail to preview
- Preview of full document will display
- Click close button, or anywhere off of preview window, to close preview
Update Underwriter Document
Updating an Underwriter Document will change document version for all future orders. Past order will not have updated document unless the order is updated.
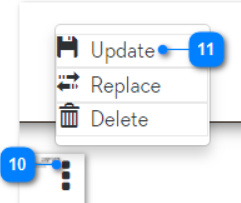
- Click the drop down on relevant thumbnail
- Click Update button
- Select a new document to upload and enter description (Figure 1, #2-3)
- Click Upload button (Figure 1, #4)
- After document is uploaded, new thumbnail and document preview are shown
Replace Underwriter Document
Replacing an Underwriter Document will change the document version for all past and future orders. No update to past orders is needed, underwriter document will automatically update.
- Click on the drop down on the relevant thumbnail
- Click Replace button
- Select a new document to upload and enter description (Figure 1, #2-3)
- Click Upload button (Figure 1, #4)
- After document is uploaded, new thumbnail and document preview are shown
Delete Underwriter Document
Individual underwriter documents can be deleted. If the document has previously been assigned to an order, it cannot be deleted. A warning will display if document cannot be deleted.

- Click drop down for document to be deleted
- Click Delete button
- Confirm deletion of document
- Underwriter document is now deleted
HTML Editor
The HTML editor has many features that can be used for editing documents and templates. Using this editor, it is possible to edit the contents and styling of all documents. The following image shows features and their locations in the menu of the HTML editor. For more information on each feature, see annotations below.

-
 Bold
Bold
Change text to/from bold. Can highlight and add/remove bold from text. -
 Italic
Change text to/from italic. Can highlight and add/remove italic from text. -
 Underline
Change text to/from underlined. Can highlight and add/remove underline from text. -
 Strikethrough
Change text to/from strike through. Can highlight and add/remove strike through from text. -
 Subscript / Superscript
Change text to a subscript (below the text) or Superscript (above the text) font. -
 Font
Font
Change font of text -
 Text Size
Change size of text -
 Colors
Change color of text and background -
 Inline Style
Change text style -
 Paragraph Style
Change paragraph style -
 Paragraph Format
Select Heading Format (h1 through h4) -
 Align
Align
Change Text alignment to Left, Center, Right or Justified -
 Ordered and Unordered Lists
Create a list with Bullet points, numbers or letters -
 Decrease / Increase Indent
Move selected line of text one tab space left or right -
 Quote
Quote
Add vertical line on left side of text indicating a quote. Amount of quotes can be increased and decreased -
 Insert Link
Insert hyperlink into the text -
 Insert Image
Add an image to the text -
 Insert Video
Add a video to the text -
 Upload File
Select a file to upload to the text -
 Insert Table
Insert a table with a specified amount of rows and columns -
 Emoticon
Add emoji to the document -
 Add Horizontal Line
Insert horizontal line at location of cursor -
 Select All
Selects entire contents of text -
 Clear Formatting
Remove all formatting changes made to text -
 Undo / Redo
Undo or redo changes made to the text -
 Code View
View HTML for the document